The Best Strategy To Use For Hamilton Drywall Repair
Wiki Article
What Does Ceiling Repair Hamilton Do?
Table of ContentsGetting The Drywall Mudding To WorkDrywall Installers Hamilton Things To Know Before You BuyExcitement About Ceiling Repair HamiltonEverything about Drywall MuddingSome Known Questions About Drywall Taping Hamilton.The Drywall Installation PDFs
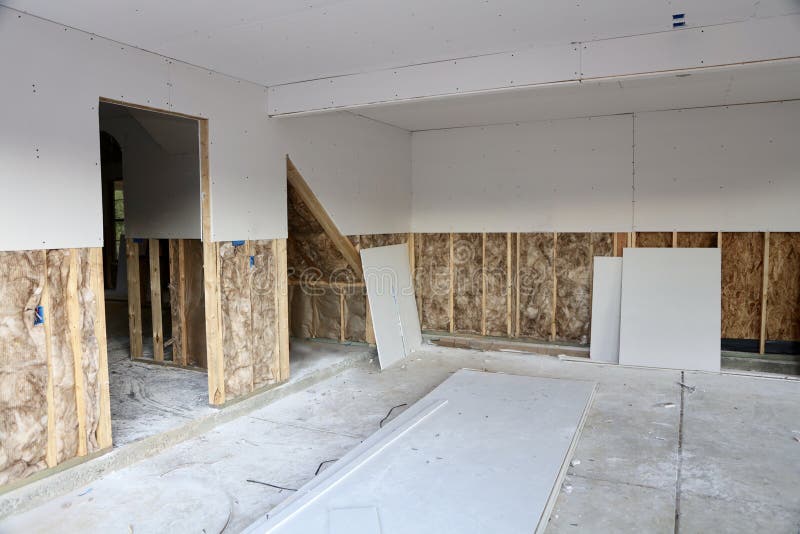
If the board isn't the complete size of the ceiling, it needs to finish in the middle of a joist, or you'll have to gauge to the center of the farthest framing part that the board overlaps. Mark the new dimensions on the edge of the very first board. Utilize a square to lead you while scoring the mark with an utility knife.
After safeguarding the board in location, safe and secure five evenly-spaced screws in a line throughout the entire sheet as well as right into the mounting part closest to its. Use the top plate marks to maintain the screws in line, ascertaining that each screw goes to the very least half an inch from the closest side.
Follow these suggestions for gauging wallboards for your walls: Gauge the wall's width as well as cut the drywall sheet to make sure that it's concerning a quarter-inch much shorter than the dimension. Utilizing a lift or an aide, prop the drywall up and position it tight versus the ceiling. Rating the mark with an utility knife as well as a drywall square, and also snap the excess material versus the line.
7 Easy Facts About Drywall Mudding Described
Drywall adhesive will certainly also enhance the noise decrease of your walls. Follow these methods for covering the wall surface with drywall boards: Before applying the drywall, guarantee that the first board will certainly end up in the middle of a stud, the upright framing component of a wall. If you need to make adjustments, reduced the board to make sure that it suits the center.Drive drywall screws right into the center of the board at a practical elevation. When you have actually installed the very first screws, put in the remainder, working from the center of the board outward. Drive the screws as well as evenly room them apart as you secure them right into all the studs. To cover the wall surface easily, hang the drywall horizontally to minimize the amount of glue, placing the joint at a practical height.
The space most likely has windows and doors, and you'll require to cut the drywall for an existing or future opening. Comply with these tips for trimming the location where a sheet covers a window that you haven't mounted yet: Cover the home window with a drywall sheet and drive in a few screws to indicate the future home window's corners.
If you intend to cut around a door: Outline the drywall similarly you would certainly gauge for a home window cut. Eliminate the trim around the door, as well as lean the sheet of drywall versus the door opening. Mark where the studs are as well as draw the line for the top of the door opening.
Getting The Drywall Repair Hamilton To Work
If you intend to make cuts for electric outlets: Mark the height of package for the outlet from the flooring. With the electrical power off, screw the drywall to the studs, covering the electric box. Find the within edge click to read more of package by piercing the drywall with the stab saw and reducing outward.Cut a piece of drywall long so that it hangs over the corner. Hamilton drywall installation. For inside edges, make certain items fit closely but aren't obstructed with each other.
You can leave about an eighth of an inch in between the boards because you'll fill up any type of spaces with drywall substance later. To fill up the joints, make use of a container of light-weight drywall compound. Ensure you have enough material in the mud pan to use one full coat on the mounting component where you'll be working.
Cover the full period of the wallboard joint with substance utilizing your drywall blade. Lay the joint tape on your recently covered joint while the drywall substance is still wet.
Some Known Facts About Drywall Repair Hamilton.
To obtain the very first and also second coat of the corners, as opposed to making use of tape, utilize a metal or fiber board edge grain, depending upon the traffic you anticipate to have in the location. Lay it on top of the very first layer and afterwards apply a 2nd layer of compound over it.Cover any protruding screw heads with the substance after driving them into the wall. Wait on the walls to dry, till the substance transforms totally white. Use the last thin layer to all the seams and More hints also edges making use of a drywall blade. If you needed to fix any sticking out screw heads, you should also lay a 2nd layer there.
In some spaces, you may not have any kind of upright seams if you use 12-foot-long drywall panels. As you start mounting the drywall panels on your wall surfaces and ceilings, you can use a pencil to note the center of the wall surface studs on the flooring and also ceiling, so that you can drive your uniformly spaced drywall screws along the studs to protect your sheets.
Cut an item of drywall long so that it hangs over the corner. For within corners, make certain pieces fit very closely yet aren't jammed with each other.
Ceiling Repair Hamilton Can Be Fun For Anyone
You can leave around an eighth of an inch between the boards given that you'll fill any type of voids with drywall compound later on. To fill the joints, use a container of light-weight drywall substance. Make sure you have sufficient material in the mud frying pan to use one complete layer on the framing component where you'll be functioning (drywall installers Hamilton).Cover the full span of the wallboard joint with compound utilizing your drywall blade. Usage light, even layers, to fill the spaces and make them level with boards on either side. Lay the joint tape on your newly covered joint while the drywall compound is still damp. Leave regarding an eighth of an inch of area if 2 pieces intersect.
To get the initial and 2nd coat of the edges, as opposed to making use of tape, make use of a metal or fiber board corner bead, depending on the website traffic you anticipate to have in the area. Lay it on top of the very first visit this site right here layer and after that use a second layer of substance over it.
Cover any protruding screw heads with the substance after driving them right into the wall surface. Apply the last thin layer to all the seams and corners utilizing a drywall knife.
Getting The Drywall Mudding To Work
In some areas, you might not have any type of upright joints if you make use of 12-foot-long drywall panels. As you start setting up the drywall panels on your walls as well as ceilings, you can make use of a pencil to note the middle of the wall studs on the floor and also ceiling, to ensure that you can drive your equally spaced drywall screws along the studs to safeguard your sheets.Report this wiki page